
A storage shed or workshop is only as good as what it sits on. Skip the concrete base and your shed settles unevenly. Doors stick. Moisture creeps in from below. The building wears out years before it should. A concrete shed slab eliminates these problems by providing a level, stable, moisture-resistant base that protects your investment for decades. Venture Concrete & Fencing pours shed slabs for homeowners throughout Pearl River, Slidell, Covington, Mandeville, Abita Springs, and Madisonville.
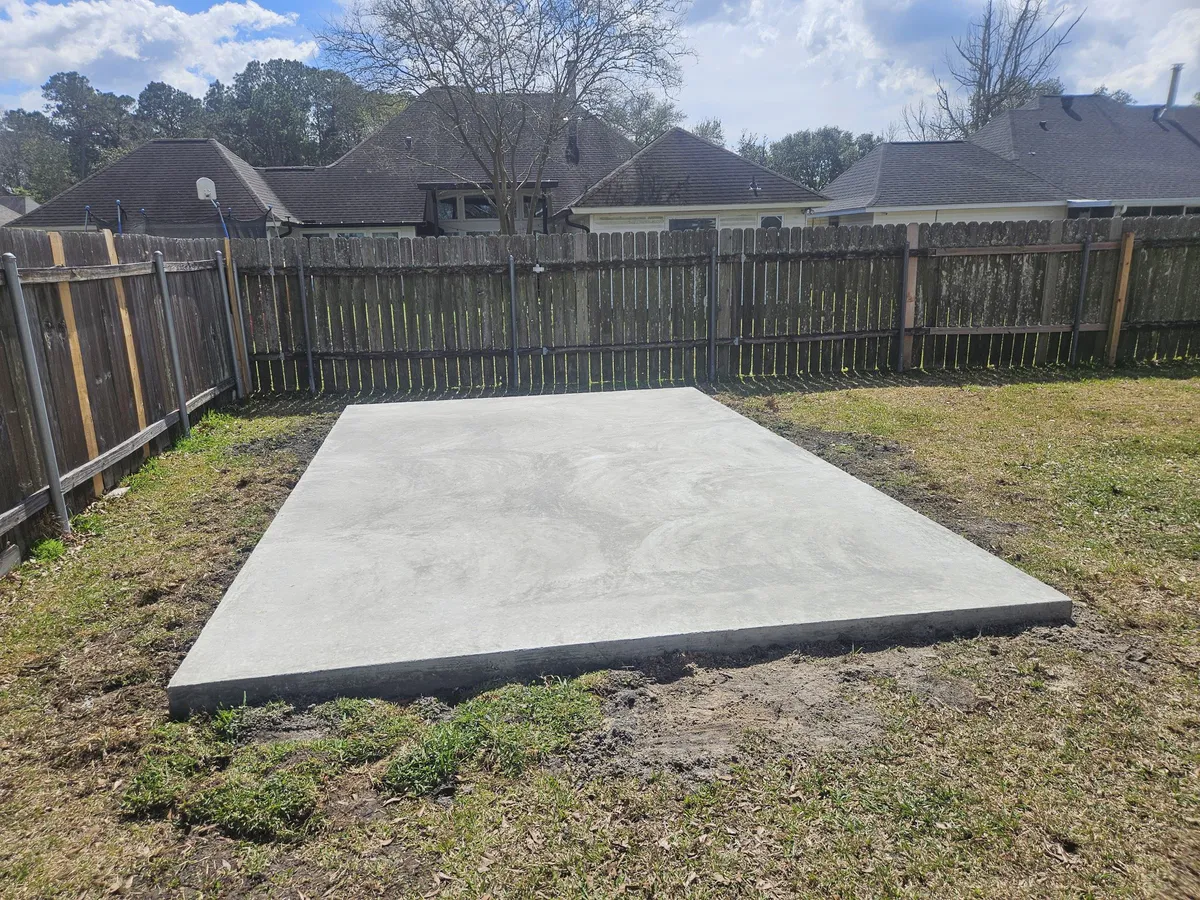
A concrete shed slab provides a base for your shed. Share the shed plan or manufacturer requirements so we can discuss the footprint and preparation for your site. Our Slidell crew serves homeowners in Pearl River, Lacombe, Mandeville, Covington, and Madisonville.
Why Your Shed Needs a Concrete Slab
- Level surface: A concrete slab is poured perfectly level, so your shed sits flat, doors open and close properly, and shelving stays plumb.
- Moisture protection: Concrete blocks ground moisture from wicking up into the shed floor, preventing rot in wooden sheds and rust in metal buildings. This is especially important in Louisiana's humid climate.
- Pest barrier: A solid concrete slab eliminates the gap between the shed and the ground where termites, rodents, and snakes find entry points.
- Load support: A reinforced slab distributes weight evenly, supporting heavy equipment, tools, and stored materials without the floor sagging or shifting.
- Longevity: A concrete slab base extends the life of any shed or outbuilding by keeping it off the wet ground and preventing settling that stresses the frame.
Slab Specifications
The right thickness and preparation depends on what the slab will support:
Standard Storage Shed (4 inches)
For light storage sheds - lawn gear, seasonal boxes, household overflow - a 4-inch slab with wire mesh is plenty. This is the standard specification for most residential sheds.
Heavy-Duty Workshop (5-6 inches)
Putting heavy equipment, a vehicle, or a real workshop inside? Go with a 5-6 inch slab and rebar. This handles the concentrated weight of workbenches, tool chests, and machinery without cracking.
Subbase Requirements
Every shed slab sits on a compacted gravel subbase, typically 4-6 inches deep. This layer serves two purposes: it provides stable support to prevent settling, and it creates a drainage layer that moves water away from the slab bottom. In areas with high water tables, common in parts of Slidell and Pearl River, we may recommend additional gravel depth or a vapor barrier. A well-built subbase is what turns a simple pad into a true shed foundation that holds its shape for decades.
Drainage Considerations
Louisiana gets heavy rainfall, and your shed slab needs to handle water management properly:
- The slab is poured slightly above surrounding grade so rainwater flows away rather than pooling against the base
- Grading around the perimeter directs runoff away from the building
- For enclosed buildings, we can integrate a French drain or gravel trench along one or more sides
- The compacted gravel subbase allows minor groundwater to drain beneath the slab rather than building up hydrostatic pressure
Slab Thickness Recommendations by Shed Size
Pad sizing is the question we get most often, and the answer depends as much on what is going inside the building as on the building footprint. The numbers below are the specs we actually pour, not catalog defaults. If you are unsure, send us the shed manufacturer's drawing or describe what you plan to store and we will spec it for you.
- 8x8 to 8x10 garden shed (64 to 80 sq ft): 4 inches with wire mesh or fiber reinforcement. Suitable for hand tools, mowers, garden supplies. Single afternoon pour off a small concrete truck or a few short-load deliveries.
- 10x12 to 10x16 storage shed (120 to 160 sq ft): Standard 4-inch slab with mesh handles this range easily for residential storage. Step up to fiber-reinforced concrete if you want a cleaner finish without visible mesh joints.
- 12x16 to 12x20 shed or small workshop (192 to 240 sq ft): 4 inches still works for storage, but go 5 inches with rebar if you plan a workbench, table saw, or other heavy point loads.
- 14x20 to 14x24 workshop or hobby space (280 to 336 sq ft): 5 inches with #3 rebar in a grid pattern. The larger footprint sees more differential movement, and the rebar holds it together.
- 16x20 and larger workshop, gym, or garage (320+ sq ft): 6 inches with #4 rebar, with thickened edges on any wall lines that will carry vertical loads. For any building rated to hold a vehicle, this is non-negotiable.
- Lean-to or open carport over the pad: Same thickness as the equivalent enclosed building. The slab still has to carry the same loads even if the walls are open.
At every size, we pour the slab 4 to 6 inches wider than the shed on all sides. The walls get solid bearing, and the siding stays up off the ground.
Prep Work That Actually Matters
The pour itself is the easy part. What goes underneath the concrete decides whether the slab stays level for 30 years or starts cracking and settling in two. Here is the prep we do on every shed slab in the Greater New Orleans area.
- Topsoil and organic removal: The first 4 to 8 inches of native soil usually contains roots, leaf litter, and organic material that will rot. All of it has to come out. Skipping this step is the single most common reason shed slabs settle.
- Subgrade compaction: Once the dig is clean, we plate-compact the bottom of the excavation. On the soft clay soils common in Lakeview, Mid-City, eastern Slidell, and most of New Orleans East, we may also bring in a few inches of select fill before the gravel base goes down.
- Compacted gravel base: 4 inches minimum (6 inches on high water table sites) of #57 crushed limestone or comparable angular gravel. Laid in two lifts, each plate-compacted. Angular stone locks together and stays compact, smooth river rock or pea gravel does not.
- Vapor barrier (when applicable): For enclosed workshops, gyms, or any building storing moisture-sensitive items, we lay 6 to 10 mil polyethylene sheeting on top of the compacted gravel, lapped at the seams and turned up at the form edges. The barrier blocks moisture migration up through the slab. For open-walled garden sheds and lawn equipment storage, the vapor barrier is usually skipped.
- Reinforcement placement: Wire mesh or rebar sits on plastic chairs at the correct height, never directly on the gravel. Steel laid on the ground does nothing, it has to sit inside the concrete to work.
- Anchor bolt layout: For sheds requiring anchor bolts (most prefab kits and any stick-built structure), we mark and place J-bolts or wedge anchors during the pour according to the manufacturer's plan or local wind-rating requirements.
Permits and Local Requirements in Greater New Orleans
Slab projects connected to a permanent enclosed building usually trigger a permit somewhere in the process. The exact rule depends on which parish and city the lot sits in. We have poured shed slabs across all of these jurisdictions and we know the basic thresholds.
- Orleans Parish (New Orleans): Accessory structures generally require a permit through the Department of Safety and Permits. Historic districts (Garden District, Marigny, Bywater, French Quarter, parts of Mid-City and Uptown) also require HDLC review for visible structures.
- Jefferson Parish (Metairie, Kenner, Harahan): Permits required for accessory structures over thresholds set by the parish, with setback rules from property lines and the main residence. Lakeview has additional drainage considerations near the canal corridors.
- St. Tammany Parish (Slidell, Covington, Mandeville, Madisonville, Abita Springs): Permits typically required for any structure with a footprint over 200 square feet, lower in some incorporated cities. HOA approval is also required in most subdivisions before any permanent structure goes in.
- Tangipahoa Parish (Ponchatoula, Hammond): Permitting through parish or municipal offices depending on the lot location, plus flood elevation requirements in low-lying areas.
- Setbacks: Most parishes require accessory structures to sit at least 3 to 10 feet from property lines and a similar distance from the main house. Side and rear setbacks are usually different from front setbacks. We confirm setbacks against your survey before we form the slab.
- Flood zones: Lots in designated AE or VE zones may require the finished slab elevation to meet minimum base flood elevation (BFE), even for a shed. This affects how much fill goes in before the pour and can add cost. We will tell you if your lot falls into this category.
If you already have the shed picked out and a delivery scheduled, get us involved early. Permitting can add a few weeks to the timeline if you have not already started the paperwork, and we would rather pour to the right spec the first time than rework a slab to match a permit issued after the fact.
What Drives the Cost of a Shed Slab
We do not publish a flat per-foot number, because the price of a shed slab depends on the lot far more than the square footage. Two pads the same size can land in very different places depending on what is underneath them and how the truck gets to the form. These are the factors we walk through with you on the free site visit.
- Pad size and thickness: A 4-inch storage slab is the baseline. A 5-inch workshop slab with a rebar grid, or a 6-inch slab built to hold a vehicle or heavy machinery, uses more concrete and steel.
- Subgrade and base prep: Soft clay, a high water table, or a lot full of roots and organic soil needs more excavation, more compacted gravel, and sometimes select fill before the pour. Clean, firm subgrade keeps prep light.
- Truck access: The single biggest swing. A slab the concrete truck can pour straight off the chute is the simplest job. Wheelbarrow runs through a gate, buggy access across a soft yard, or pump-truck delivery for a tight backyard all add labor.
- Vapor barrier and reinforcement: Enclosed workshops get poly sheeting under the slab and a heavier reinforcement schedule. Open-walled garden sheds usually do not.
- Extras: Anchor bolts set to a manufacturer plan, and removal of an existing slab or pad, add to the job.
Rather than guess, we come out, measure, check the subgrade and the access, and hand you a free, written, itemized quote with no obligation. You see exactly what each part of the job costs before anything is poured.
Concrete Slab vs Pier or Gravel: Choosing a Shed Foundation
Most shed manufacturers list three shed foundation options: concrete slab, pier (or "skid") base with a wood floor, and gravel pad. They are not equivalent in this region. Here is what we have learned pouring shed slabs across Southeast Louisiana.
- Concrete slab: 30 to 50-year life. Level, dry, pest-resistant, code-friendly for permanent structures. Higher up-front cost. The right answer for any shed you plan to keep, especially anything enclosed or holding tools that rust.
- Pier or skid base: Cheaper short-term, but the gap between the floor and the ground fills with humid air, termites, and rodents in this climate. The wood floor eventually rots from below even with pressure treatment. Works for portable buildings on dry, high-elevation lots, but we do not recommend it for permanent installations in Greater New Orleans.
- Gravel pad: The cheapest option, fine for very small (under 8x8) garden sheds the homeowner does not mind replacing in 10 years. The pad settles unevenly within a couple seasons in our clay soils, water pools at the base of the shed walls, and the bottom plate of the building stays wet for most of the year. Not suitable for workshops or anything over about 10x10.
If budget is the question, a 4-inch concrete slab is only 30 to 40% more than a quality gravel pad once you account for proper base prep on the gravel option. The slab buys you decades of life and a usable floor surface for that small premium, which is why almost every shed we get called out to pour ends up on concrete.
Installation Process
- Site selection: We confirm the location is accessible, check for underground utilities (call-before-you-dig ticket goes in 48 hours before the pour), and verify proper setback distances from property lines and other structures.
- Excavation and grading: The area is dug to the correct depth, leveled, and graded for drainage. Soft or organic soil is removed and replaced with compactible fill where needed.
- Gravel base: A layer of #57 crushed limestone or gravel is spread and compacted in lifts to provide a firm, level base. Vapor barrier is added on enclosed-building slabs at this stage.
- Forming: Wooden forms are set to the exact slab dimensions. We confirm they are level, square, and at the correct elevation before proceeding.
- Reinforcement: Wire mesh or rebar is placed on chairs to maintain proper position within the concrete pour. Anchor bolt positions are marked from the shed manufacturer's plan.
- Pour and finish: Concrete is placed, screeded level, and finished with a broom texture for traction. Anchor bolts are set into the wet concrete during the pour. Edges are tooled and a control joint is cut across the slab if the footprint warrants it (typically slabs over 12 feet in any direction).
- Curing: Spray-applied curing compound goes on within an hour of finishing. The slab is cordoned off for 24 to 48 hours of foot-traffic restriction and 7 days before the shed is placed.
Plan Your Shed Slab
Start with your city and the type of shed you want to place. If you have a shed plan or manufacturer dimensions, share them when available so the quote can account for the required footprint and site access.
Serving Slidell, Covington, Mandeville, Madisonville, and Pearl River.
Still deciding how to use the space? Explore concrete patios.
Build on a Solid Shed Slab
Give your shed or workshop the concrete base it deserves. Free estimates for shed slab installation across the Northshore.